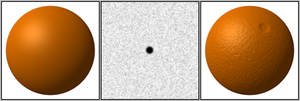
Bump mapping[1] is a texture mapping technique in computer graphics for simulating bumps and wrinkles on the surface of an object. This is achieved by perturbing the surface normals of the object and using the perturbed normal during lighting calculations. The result is an apparently bumpy surface rather than a smooth surface, although the surface of the underlying object is not changed. Bump mapping was introduced by James Blinn in 1978.[2]

Normal mapping is the most common variation of bump mapping used.[3]
Principles
editBump mapping is a technique in computer graphics to make a rendered surface look more realistic by simulating small displacements of the surface. However, unlike displacement mapping, the surface geometry is not modified. Instead only the surface normal is modified as if the surface had been displaced. The modified surface normal is then used for lighting calculations (using, for example, the Phong reflection model) giving the appearance of detail instead of a smooth surface.
Bump mapping is much faster and consumes fewer resources for the same level of detail compared to displacement mapping because the geometry remains unchanged.
There are also extensions which modify other surface features in addition to increasing the sense of depth. Parallax mapping and horizon mapping are two such extensions.[4]
The primary limitation with bump mapping is that it perturbs only the surface normals without changing the underlying surface itself.[5] Silhouettes and shadows therefore remain unaffected, which is especially noticeable for larger simulated displacements. This limitation can be overcome by techniques including displacement mapping where bumps are applied to the surface or using an isosurface.
Methods
editThere are two primary methods to perform bump mapping. The first uses a height map for simulating the surface displacement yielding the modified normal. This is the method invented by Blinn[2] and is usually what is referred to as bump mapping unless specified. The steps of this method are summarized as follows.
Before a lighting calculation is performed for each visible point (or pixel) on the object's surface:
- Look up the height in the heightmap that corresponds to the position on the surface.
- Calculate the surface normal of the heightmap, typically using the finite difference method.
- Combine the surface normal from step two with the true ("geometric") surface normal so that the combined normal points in a new direction.
- Calculate the interaction of the new "bumpy" surface with lights in the scene using, for example, the Phong reflection model.
The result is a surface that appears to have real depth. The algorithm also ensures that the surface appearance changes as lights in the scene are moved around.
The other method is to specify a normal map which contains the modified normal for each point on the surface directly. Since the normal is specified directly instead of derived from a height map this method usually leads to more predictable results. This makes it easier for artists to work with, making it the most common method of bump mapping today.[3]
Realtime bump mapping techniques
editFrom left:
- surface bitmap, intentionally blurry,
- source of light bitmap,
- bump mapping effect with light source orbiting trajectory.
Realtime 3D graphics programmers often use variations of the technique in order to simulate bump mapping at a lower computational cost.
One typical way was to use a fixed geometry, which allows one to use the heightmap surface normal almost directly. Combined with a precomputed lookup table for the lighting calculations, the method could be implemented with a very simple and fast loop, allowing for a full-screen effect. This method was a common visual effect when bump mapping was first introduced.
See also
editReferences
edit- ^ "Bump and Environment Mapping" (PDF). ics.uci.edu.
- ^ a b Blinn, James F. "Simulation of Wrinkled Surfaces", Computer Graphics, Vol. 12 (3), pp. 286-292 SIGGRAPH-ACM (August 1978)
- ^ a b Mikkelsen, Morten (2008). "Simulation of Wrinkled Surfaces Revisited" (PDF). p. 7 (Section 2.2). Archived (PDF) from the original on 2019-05-26. Retrieved 2011-08-05.
- ^ Lengyel, Eric (July 2019). Foundations of Game Engine Development, Volume 2: Rendering. Terathon Software LLC. ISBN 978-0-9858117-5-4.
- ^ Real-Time Bump Map Synthesis, Jan Kautz1, Wolfgang Heidrichy2 and Hans-Peter Seidel1, (1Max-Planck-Institut für Informatik, 2University of British Columbia)
External links
edit- Bump shading for volume textures, Max, N.L., Becker, B.G., Computer Graphics and Applications, IEEE, Jul 1994, Volume 14, Issue 4, pages 18 – 20, ISSN 0272-1716
- Simple creating vectors per pixel of a grayscale for a bump map to work and more
- Bump Mapping example (Java applet)